Valentine’s Day is the perfect occasion to share a heartfelt, handmade gift with the people you love. Instead of a store-bought card, why not craft a quilted Valentine’s Day card? These mini fabric masterpieces combine the warmth of quilting with the personal touch of a handmade card. Plus, they’re a great way to use up fabric scraps and experiment with different materials and techniques. Let’s dive into the process and explore ways to make your quilted Valentine’s truly special! Check out My instagram for the part 1 and 2 video tutorial.
Materials:
One of the best things about quilted Valentine’s cards is the variety of materials you can use. Here are some essential supplies:
Fabric Scraps – Cotton, linen, or even specialty fabrics like velvet or lace can add texture and interest.
Fusible Interfacing or Batting – This adds structure and stability to your quilted piece.
Cardstock or Blank Cards – A sturdy base to attach your quilted design.
Thread – Decorative stitching can enhance your design.
Scissors or Rotary Cutter – For precise cutting.
Glue or Double-Sided Tape – To attach the quilted fabric to the cardstock.
Embellishments – Buttons, embroidery, ribbons, or even small appliqués can add personality.

Steps to Make a Quilted Valentine’s Card
Design Your Card Front
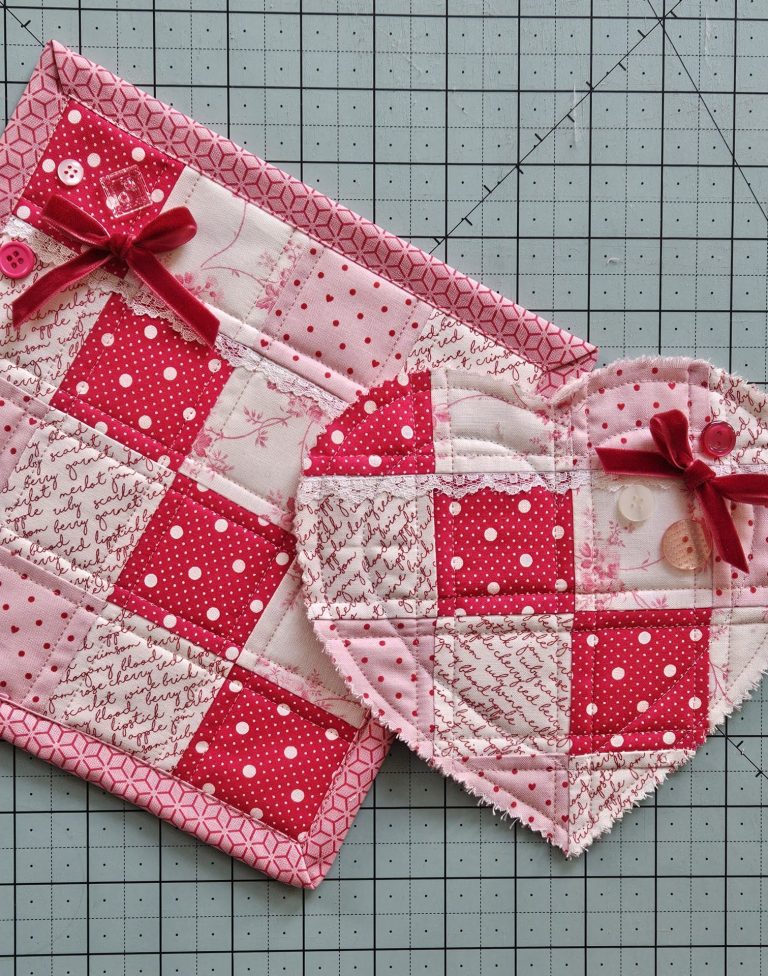
Start by planning a simple quilt block or applique design. Hearts, patchwork squares, or even a tiny crazy quilt pattern can make a lovely front. I used a very simple 16 patch to let my fabrics shine.Cut and Assemble Fabric
Use a block that won’t be compromised by cutting down the design to heart shape. Cut your fabric and piece together using a sewing machine. I used 2.5 inch squares to make my block.Add Quilting and Embellishments
Stitch through your fabric layers with decorative stitches or hand embroidery. Try free-motion quilting for a more organic look or stick with straight-line quilting for a modern aesthetic. Add embellishments like lace, ribbon, or buttons for a unique touch. I added lace into the piecing of my block to make it more cohesive, but feel free to add embellsihments after you block is pieced like the buttons or bows added to these Valentines.Trim and Attach to Cardstock
Once your quilting is complete, trim it to fit your card. Using pinking shears gives your valentine a completed edge without the hassel of binding around curves. This step can take some time, as pinking shears are a little resistant to get through all 3 layers, but it’s worth the effort. After your edge is trimed add a line of stitcing 1/4″ away from the edge to help hold things together. Using a glue stick or adhesive like fabric glue to hold the paper in place while you machine stitch around the edge to attach the cardstock securely to the quilted Valentine.Personalize Your Message
Write a heartfelt note inside! You can even stitch a small fabric label inside with an embroidered message
Make It Functional: Quilted Coasters & Mug Rugs
If you want to take your quilted Valentine’s project a step further, consider making it functional! Instead of a traditional card, you can create a small quilted coaster or mug rug that serves as both a heartfelt message and a useful gift.
How to Make a Quilted Coaster or Mug Rug:
Choose Your Size – A coaster is typically around 4” x 4”, while a mug rug can be larger, around 6” x 8”.
Layer Your Fabrics – Use a top fabric, batting for absorbency, and a backing fabric.
Quilt & Embellish – Add decorative quilting stitches, embroidery, or appliqué to make it unique.
Finish the Edges – Use binding or a turned-edge technique to create a clean finish.
Include a Personal Message – You can still attach a small fabric label or use a diagonal pocket like mine in the video.
A quilted coaster or mug rug makes a lasting and practical keepsake, ensuring your Valentine’s gift is cherished for years to come!
Ways to Add a Personal Touch
Use Favorite Fabrics – Incorporate pieces from past projects, sentimental fabric, or vintage materials for an extra special touch.
Embroider a Name or Initials – Stitching in your recipient’s name makes the card even more meaningful.
Go Miniature – Make a small quilted tag instead of a full card for a cute gift addition.

")
A Keepsake to Cherish
Unlike paper cards that might be tucked away and forgotten, quilted Valentine’s cards are keepsakes that can be displayed, framed, or even repurposed into fabric bookmarks or ornaments. Handmade with love, they capture the spirit of Valentine’s Day in a warm and personal way. So, gather your scraps, fire up your sewing machine, and create something truly special this year!
Have you ever made a quilted Valentine’s card? Share your ideas and designs in the comments below!
I send quilt postcards to grands and great grands for each holiday. They keep them. They cost more to send the postcard sometimes, but they want them postmarked. I serge around the edges.