Welcome to Slightly Biased Quilts, here beginner-friendly patterns that are quick to sew and bursting with color are a must! Today, we’re diving into a step-by-step tutorial for making the economy blocks used in our Maeve quilt pattern. This vibrant, versatile pattern is perfect for quilters of all skill levels, and its economy blocks are a fun way to play with scraps and create a stunning quilt. Whether you’re making a Baby (42” x 54”), Lap (60” x 72”), Twin (72” x 96”), or Queen (96” x 108”) size, this tutorial will guide you through crafting the Maeve quilt block with ease. Let’s get started! Download the FREE pattern to follow along and get started!
About the Maeve Quilt
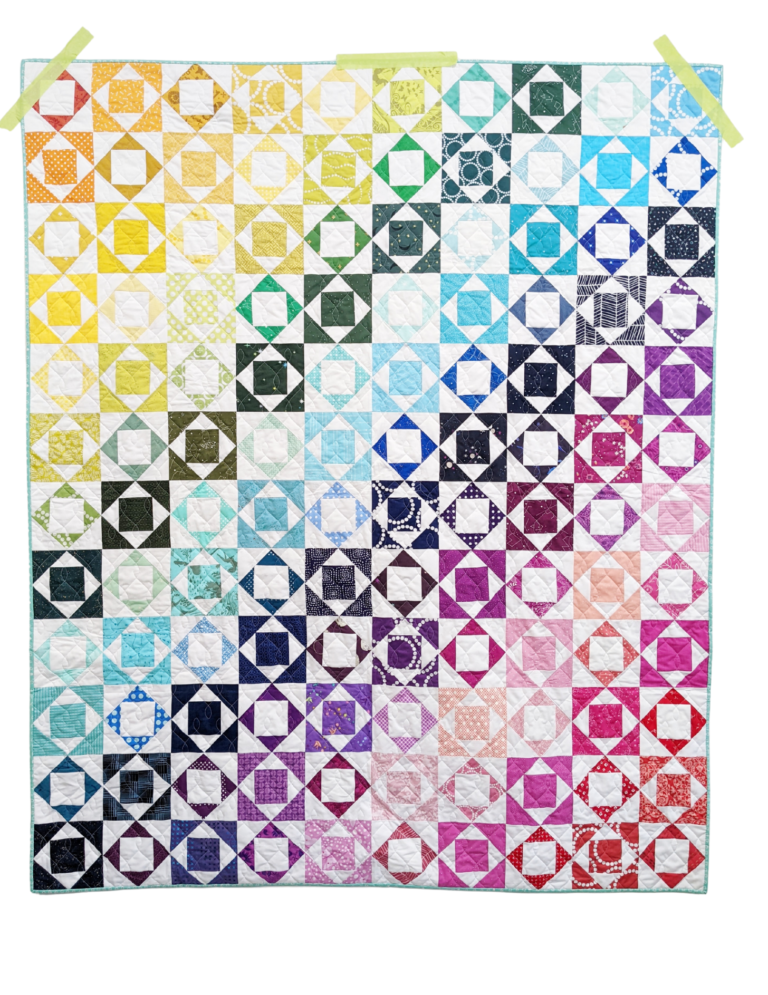
The Maeve quilt is a celebration of color and simplicity, featuring economy blocks that combine a central square with layered triangles for a dynamic, nested look. The pattern uses two block types—main blocks (color print centers with background triangles) and inverse blocks (background print centers with color print triangles)—to create a playful, balanced design. Its scrap-friendly nature makes it ideal for using up your fabric stash, and the clear instructions ensure even beginners can achieve a polished result.
Each economy block finishes at 6” x 6” (6.5” x 6.5” unfinished) and requires:
- (1) 3.5” square
- (4) 3.25” triangles (cut from 3.25” squares)
- (4) 4.25” triangles (cut from 4.25” squares)
This tutorial focuses on making one economy block, which you’ll repeat to create the total number needed for your quilt size (63 for Baby, 120 for Lap, 192 for Twin, or 288 for Queen). Download the pattern HERE to view the entire pattern with Fabric requirements for each size.
Tools:
- Sewing machine
- Rotary cutter, ruler, and cutting mat
- Pins or clips
- Iron and ironing board
- Thread (neutral or matching)
- Scissors
- Marking tool (for cutting triangles)
Notes:
- All seam allowances are ¼”.
- Assumed width of fabric (WOF) is 40”.
- RST = Right Sides Together, HST = Half Square Triangle.
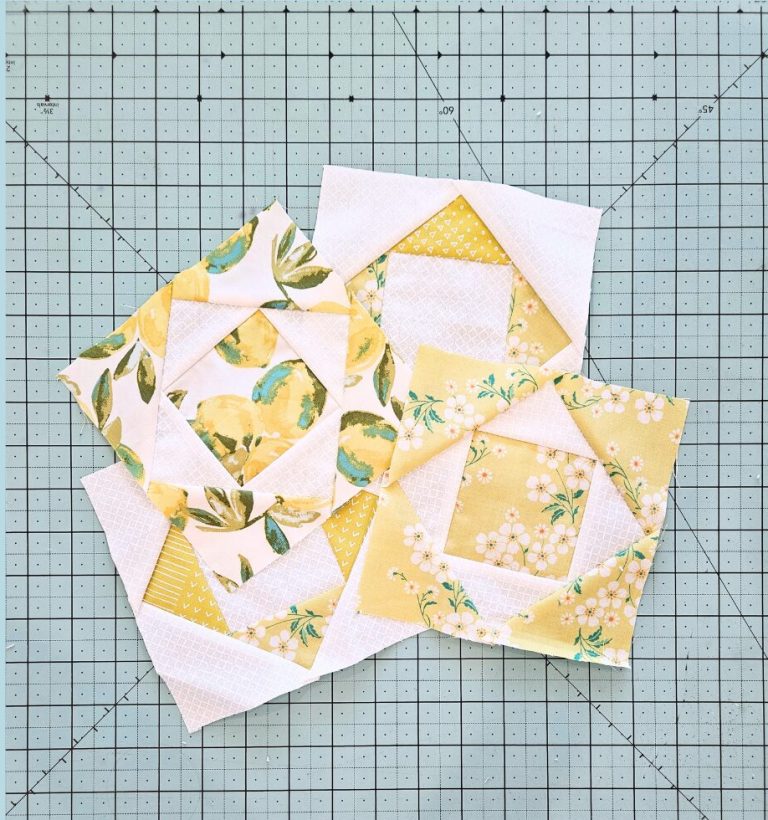
Step-by-Step Instructions: Making the Maeve Economy Block
The Maeve economy block is built by adding two rounds of triangles around a central 3.5” square, creating a square-in-square effect. We’ll walk through making one main block (color print center with background triangles), but the process is identical for inverse blocks (just swap the fabric types). Follow these steps carefully, and you’ll have a perfect 6.5” x 6.5” unfinished block! Watch the reel tutorial HERE!
Step 1: Cut Your Fabrics
For one main economy block, cut:
- Color Print:
- (1) 3.5” x 3.5” square
- (2) 4.25” x 4.25” squares (for the outer triangles)
- Background Fabric:
- (2) 3.25” x 3.25” squares (for the inner triangles)
Cutting Triangles:
- For the 3.25” squares, cut each square once diagonally to yield (4) 3.25” triangles total.
- For the 4.25” squares, cut each square once diagonally to yield (4) 4.25” triangles total.
Tip: If using scraps, ensure pieces are large enough to cut these sizes accurately. Label your triangles (e.g., “inner” and “outer”) to avoid confusion.
Step 2: Attach the Inner Triangles
- Prepare the Center Square:
- Take your 3.5” color print square and two 3.25” background triangles.
- Place one triangle on one side of the square, right sides together (RST), aligning the triangle’s long edge (hypotenuse) with the square’s edge. The triangle’s points will extend slightly beyond the square’s edges.
- Sew the First Triangle:
- Sew ¼” from the diagonal edge of the triangle.
- Press the triangle outward, away from the center square. Trim the “dog ears” (excess fabric at the corners) with scissors.
- Sew the Opposite Triangle:
- Place another 3.25” background triangle on the opposite side of the square, RST, and sew ¼” from the diagonal edge.
- Press outward and trim dog ears.
- Repeat for Remaining Sides:
- Attach the remaining two 3.25” triangles to the other two sides of the square, sewing and pressing outward each time.
- Trim the entire unit to 4.75” x 4.75” square, ensuring the center square remains centered and seams are even.
Tip: Press seams open if you prefer less bulk, but pressing outward (as directed) helps the block lie flat. Use a ruler to trim precisely, aligning with the center square’s points.
Step 3: Attach the Outer Triangles
- Prepare the Unit:
- Take your 4.75” unit from Step 2 and two 4.25” background triangles.
- Place one triangle on one side of the unit, RST, aligning the triangle’s long edge with the unit’s edge. The triangle’s points will overhang slightly.
- Sew the First Triangle:
- Sew ¼” from the diagonal edge.
- Press the triangle outward and trim dog ears.
- Sew the Opposite Triangle:
- Attach another 4.25” triangle to the opposite side, RST, sew, press outward, and trim.
- Repeat for Remaining Sides:
- Add the remaining two 4.25” triangles to the other two sides, sewing and pressing outward each time.
- Trim the entire block to 6.5” x 6.5” square, ensuring the inner unit remains centered.
Tip: When trimming, use a 6.5” square ruler and align the ruler’s diagonal lines with the block’s seams to maintain symmetry. Check that all layers (center, inner triangles, outer triangles) are proportionate.
Step 4: Check Your Block
- Your finished block should measure 6.5” x 6.5” (unfinished) and feature a color print center square framed by layers of background triangles and a layer of color triangles..
- Ensure seams are secure and the block is square. If it’s slightly off, re-trim carefully or adjust during quilt assembly.
- For inverse blocks, repeat the process using background fabric for 3.5” square, 4.25” triangles, and color print 3.25” triangles.
Step 5: Repeat for All Blocks
- Refer to the Maeve pattern for the number of blocks needed:
- Baby: 63 blocks (mix of main and inverse, per coloring page)
- Lap: 120 blocks
- Twin: 192 blocks
- Queen: 288 blocks
- Use the coloring pages provided in the pattern (pages 4–7) to plan your layout and balance main and inverse blocks for a cohesive design.
Tips for Success
- Scrap Strategy: Since Maeve is scrap-friendly, mix and match color prints from your stash for a vibrant, eclectic look. Aim for high-contrast background fabric (e.g., white, black or light gray) to make the colors pop.
- Batch Cutting: To save time, cut all 3.5” squares, 3.25” squares, and 4.25” squares for multiple blocks at once. Keep them organized by size and fabric type.
- Pressing Matters: Press seams carefully to avoid distortion. Starch can help stabilize scraps, especially if they’re small or stretchy.
- Test One Block: Sew one block first to ensure your cutting and seam allowances are accurate before cutting all fabrics.
Assembling the Quilt
Once you’ve made all your blocks, follow pattern to complete your Maeve quilt:
Maeve Quilt
The Maeve quilt is a perfect blend of simplicity and impact. Its economy blocks are quick to sew, making it ideal for beginners or quilters short on time. The scrap-friendly design lets you raid your stash for bright, bold prints, while the alternating main and inverse blocks create a rhythmic, eye-catching pattern. Whether you’re gifting a cozy Baby quilt or dressing up a bed with a Queen-size masterpiece, Maeve delivers joy in every stitch.
The Maeve pattern embodies that spirit with its beginner-friendly instructions and colorful, scrap-busting charm. So, grab your fabrics, fire up your sewing machine, and create a Maeve quilt that’s uniquely yours!
Have questions about the Maeve block or a tip for working with scraps? Drop them in the comments—we’d love to hear from you!
Happy quilting!