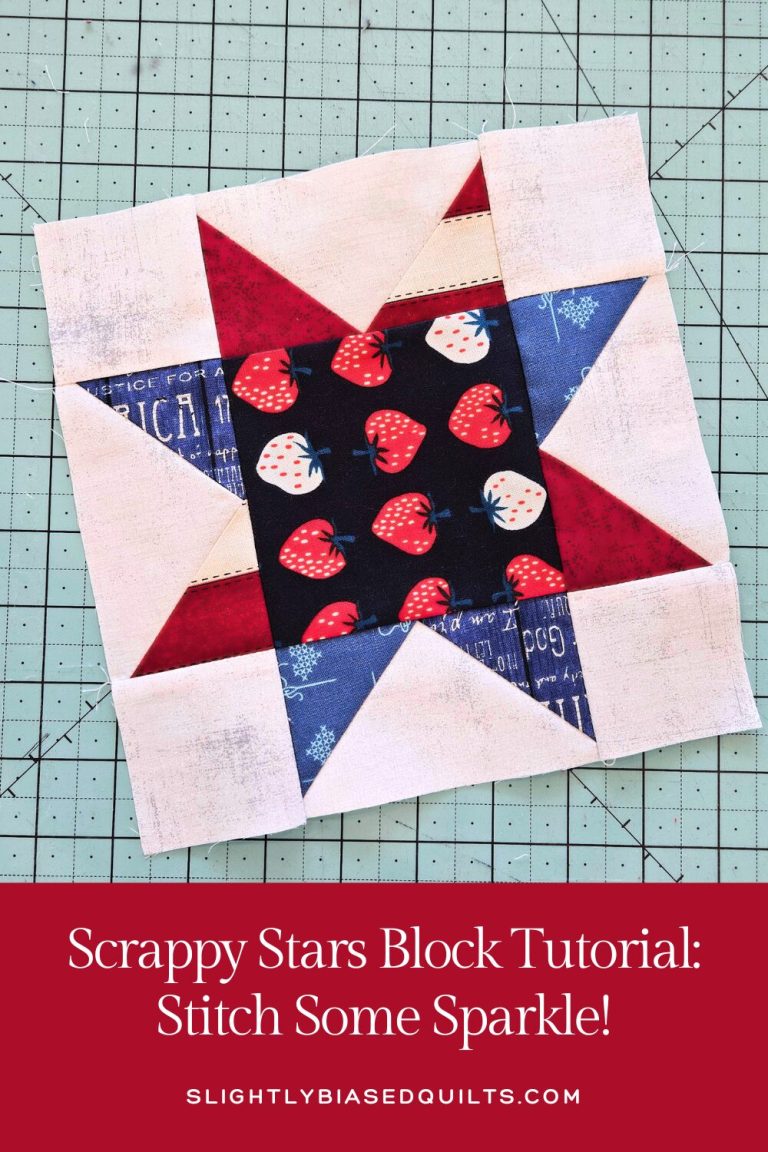
Hey, quilters! Welcome to Slightly Biased Quilts, today we’re turning your fabric scraps into a Scrappy Stars Block that’s bursting with charm. This beginner-friendly block is perfect for busting your stash and creating a star-studded quilt. Let’s get stitching and make some starry magic.
Why Scrappy Stars Rock
The Scrappy Stars Block is a scrap-lover’s dream—versatile, vibrant, and oh-so-fun to make. It’s great for beginners, uses up those precious scraps, and looks stunning in any quilt. Ready to create a reel-worthy masterpiece? Let’s dive in!
Materials You’ll Need
- Fabric Scraps: 8-10 different prints or solids for star points and center; background fabric (neutral or contrasting).
- Cutting Tools: Rotary cutter, mat, and ruler (6½-inch square ruler is ideal).
- Sewing Supplies: Sewing machine, thread, pins, iron.
Optional: A banging playlist for stitching vibes and your reel’s soundtrack!
Step-by-Step: Scrappy Stars Block
Step 1: Cut Your Fabrics
This makes one 8½-inch (unfinished) block, perfect for a 12-inch finished star.
- Star Points: (4) squares (3¼″ × 3¼″) from 4 scraps for variety.
- Star Center: (1) square (4½″ × 4½″) from a bold or sentimental scrap.
- Background: (4) squares 2½″ × 2½″, (1) square 5¾″ × 5¾″.
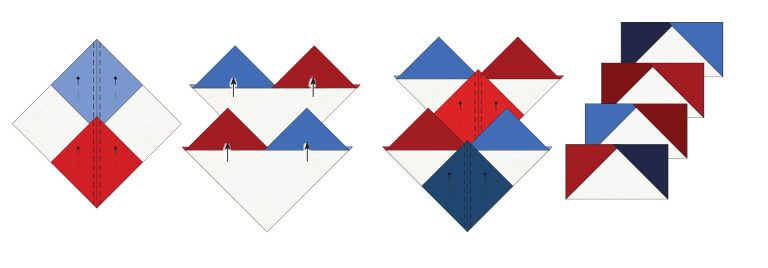
Step 2: Make Flying Geese Units
- Draw a diagonal line on the back of all four star point squares.
- Place two small squares on opposite corners of the large 5¾″ × 5¾″square, right sides together. The drawn lines should align to form a straight line across the square (the squares will overlap slightly in the center).
- Sew a scant ¼″ seam on both sides of the drawn line.
- Cut on the drawn line to create two units.
- Press the sky triangles open.
- Place another small square on each unit, right sides together, aligning the diagonal line.
- Sew a scant ¼″ seam on both sides of the drawn line again.
- Cut on the drawn line and press open.
You’ll now have 4 matching Flying Geese units!
Step 3: Assemble the Block
Lay out in a 3×3 grid:
- Top Row: Flying Geese (pointing up), Background rectangle (horizontal), Flying Geese (pointing up).
- Middle Row: Background rectangle (vertical), Star center, Background rectangle (vertical).
- Bottom Row: Flying Geese (pointing down), Background rectangle (horizontal), Flying Geese (pointing down).
- Sew rows together, pressing seams toward background pieces.
- Sew rows together, pinning at intersections for crisp points.
- Press the block and admire your star!
Step 4: Make It Yours
- Mix Fabrics: Use bold prints, fussy-cut centers, or gradients for pizzazz.
- Play with Scale: Try mini (6½-inch) or jumbo (18½-inch) blocks by adjusting sizes.
- Add Texture: Toss in linen or flannel scraps for a tactile twist.
Troubleshooting Tips
- Wonky Points? Check ¼-inch seams and pin intersections.
- Bulky Seams? Press seams open or toward darker fabric.
- Overwhelmed? Start with one block—each star builds confidence!
Get ready to shine with your Scrappy Stars Block! Share your creations and light up the quilt-iverse.
Endless Possibilities with Scrappy Stars
Wrap up your Scrappy Stars fun by thinking beyond the quilt! These blocks are as versatile as they are charming—you can turn them into patriotic quilts, festive table runners, cheerful table toppers, or cozy throw pillows. Add batting and binding and they make adorable hot pads or mug rugs, too. Whether you’re decking out your Fourth of July picnic or just want to add a pop of handmade joy to your home, Scrappy Stars are the perfect way to stitch a little sparkle into everything you make.