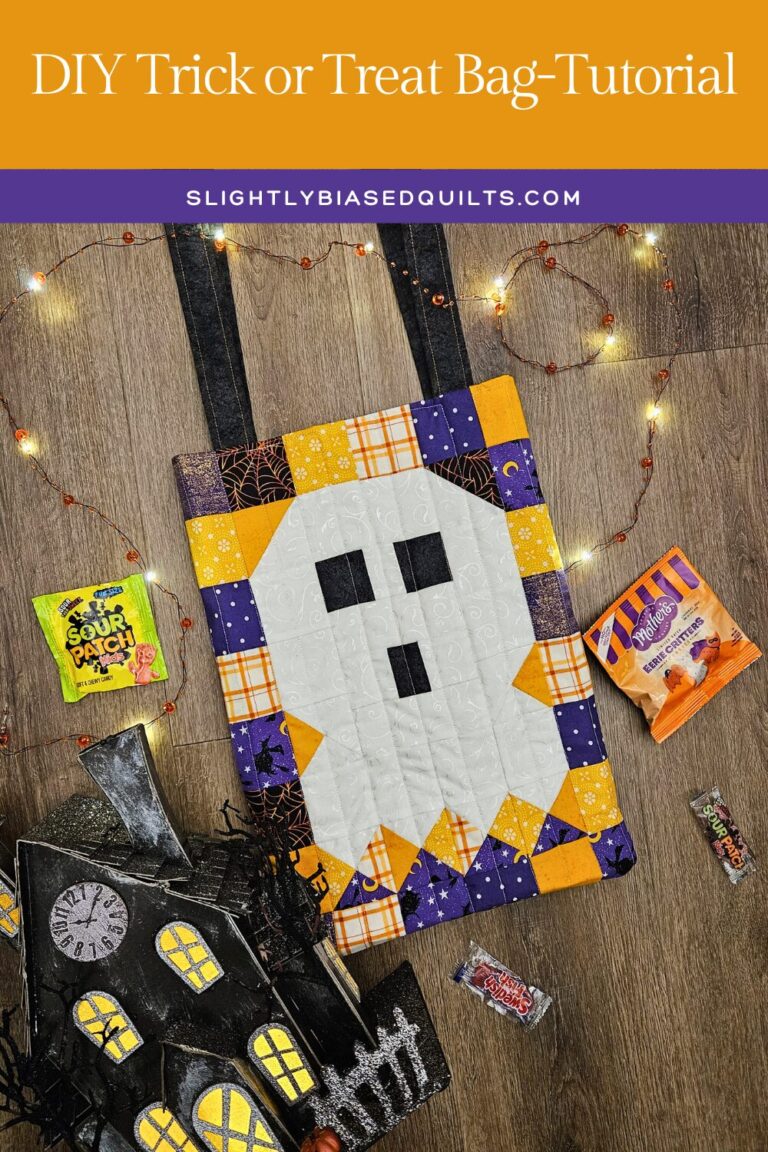
Stitch up Halloween magic with this fun, beginner-friendly trick-or-treat bag tutorial. This project blends festive fabrics with simple quilting and piecing, perfect for a quick seasonal sew. With this Casper Trick-or-Treat Bag pattern from Slightly Biased Quilts, This tutorial will walk you through creating a charming ghost-themed bag that’s ideal for collecting candies or as a spooky decoration. Finished size: 12″ x 16″.
Half-Square Triangles (HSTs)
- Take one 3″ Background fabric and one 3″ square White fabric RST and mark the wrong side of the White fabric on the diagonal with a disappearing pen.
- Sew ¼” away from the diagonal on both sides. Cut the fabric on the marked line and press each piece, pressing seam open.
- Trim each to 2.5″ square.
Repeat to make 2 HST units.
(Visual: A step-by-step diagram showing stacking squares, drawing diagonal, sewing lines, cutting, and resulting triangles x2.)
Quarter-Square Triangles (QSTs)
- Follow the HST instructions using (1) 3.5″ Background square and (1) 3.5″ White square to make two HST units. Press to the dark side, but do not trim units. Repeat one more time for a total of three Background/White HST units. Repeat using (2) 3.5″ Background squares for a total of two Background/Background HST units.
- Take one Background/White HST and mark the wrong side on the diagonal, crossing the seam, with a disappearing pen. Mix and match this HST with a Background/Background HST that you have made.
- Place the two HSTs RST, nesting seams, with opposite fabrics on top of each other. Sew ¼” away from the drawn diagonal on both sides. Cut the fabric on the marked line and press each piece, pressing seam open.
- Trim to 2.5″ square.
Repeat steps 2-4 to make (4) total BG/BG/BG/White QSTs. Repeat steps 2-4, this time matching one Background/White HST with a 3″ White square, to make (2) White/White/White/BG QSTs.
(Visual: A step-by-step diagram showing HST creation, marking new diagonal, sewing, cutting, and resulting QSTs x2.)
Ghost Assembly
Lay out HSTs, QSTs, 2.5″ White squares, Black pieces, 2.5″ Background squares, and remaining rectangles as shown in the diagram. First sew the center (face) together by sewing rectangles into rows, then sew rows together. Next sew remaining squares together into rows, then sew rows together. Final panel top will measure 12.5″ x 16.5″.
(Imagine a diagram here showing the ghost layout with pieces labeled, such as 2″ x 4.5″ white strip for the mouth area, black squares for eyes, and wavy bottom with QSTs forming the ghost’s tail.)
Watch the Tutorial below! Download the Pattern here to follow along.
Finishing Your Bag
Make Handles using interfacing. Layer the bag front with backing and quilt as desired.
Make a bag back with a solid piece for fabric for the outside and inside.
Sew the bag front and back right sides together and finish the edge with a zig zag stitch or a serger.
Turn the bag and enjoy an evening full of Trick-or-Treating.
Your Casper Trick-or-Treat Bag is ready for Halloween adventures! This beginner-friendly project is a great way to practice piecing triangles and basic bag construction. Share your makes on social media with #slightlybiasedquilts. For more patterns, visit www.slightlybiasedquilts.com.
Happy sewing!